Power Rack Jargon Explained
Being a non-native English speaker, I very well understand how it feels to be browsing a website and struggling to understand all manner of terminology. If you are relatively new to weight training, you might find yourself scratching your head when reading our site when we reference certain terms.
Power racks and cages are a category where we frequently refer to parts and specifications using industry-specific terminology that will have the layman confused. Even those within the industry may not know the difference between a spotter arm and a spotter bar.
Or we might refer to a j-hook, where you call them a j-cup – and a j-cup is not related to a d-cup!
The popularity of power racks has grown dramatically in recent years, even for those that are new to weight training. If you research the best home gym setups for beginners, many of these articles will point you in the direction of a power rack.
Researching your dream home gym can be daunting enough given the range and diversity of gym equipment available these days. This article will give you a rundown of power rack specific terminology.
J-hooks
J-hooks also called bar holders and j-cups, are designed to hold your barbell at the desired height. Although there are some machines which feature fixed height bar holders – basically they will have multiple fixed j-hooks, instead of a pair that can be easily moved.
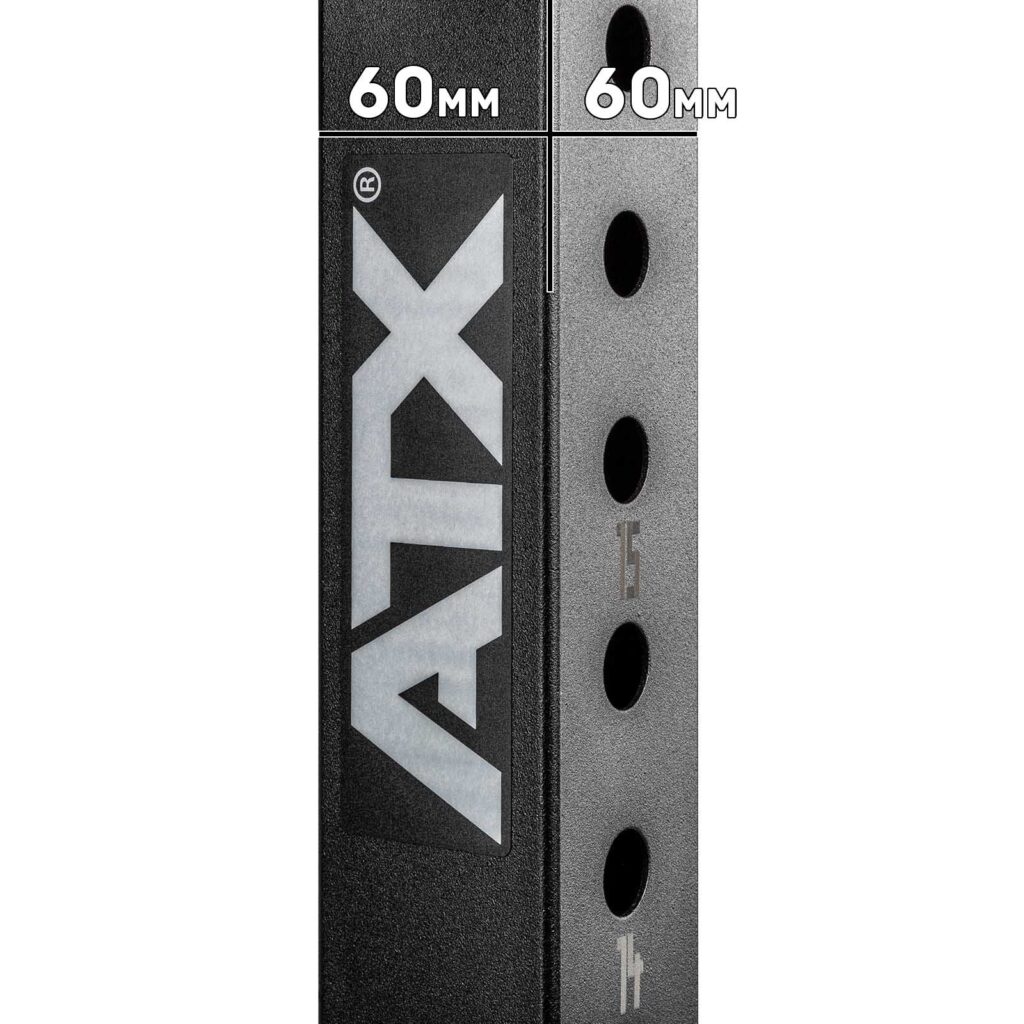
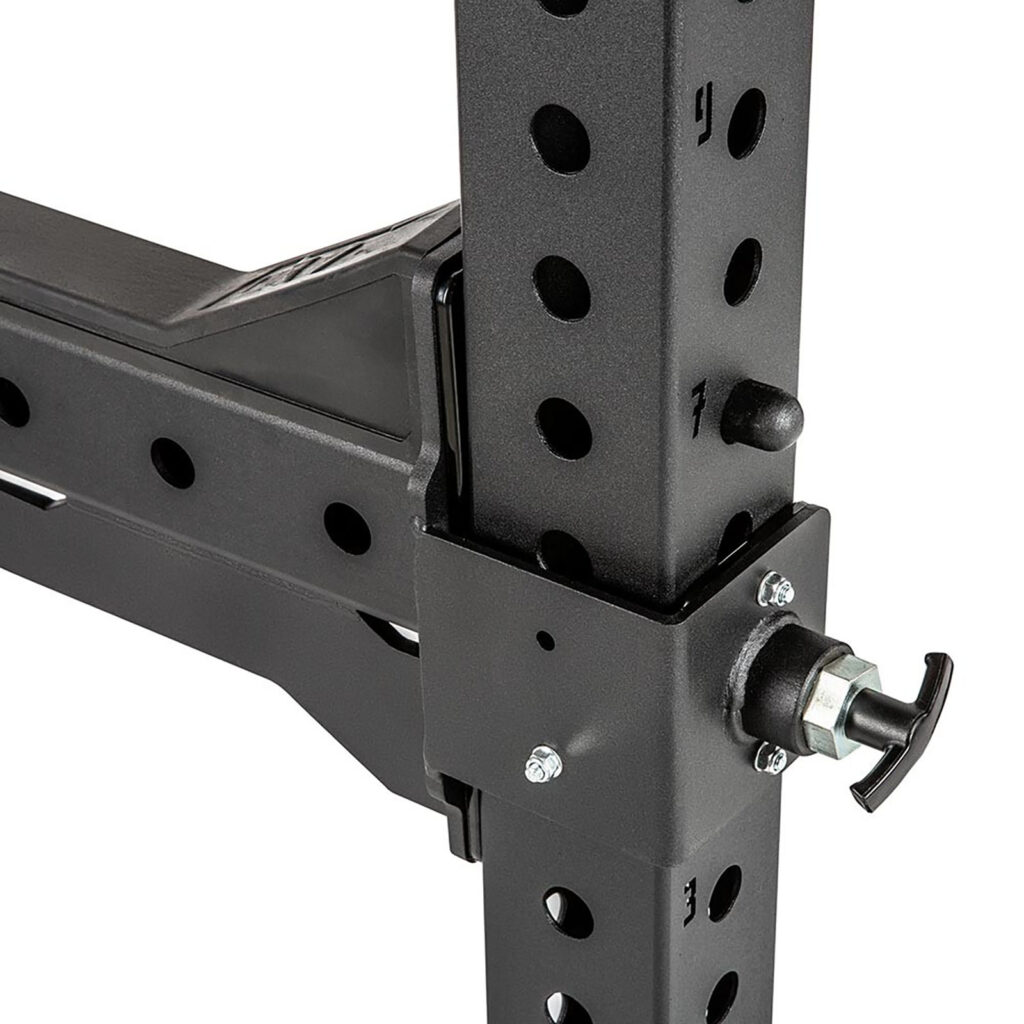
When purchasing j-hooks you should be aware of their compatibility with your machine and design features. On most of our listings you will see a “Compatibility” part, which will say something like – Suitable for other Machines with 60 mm x 60 mm uprights, 21 mm hole and 5 cm hole spacing.
Suitability:
Upright Dimensions
The 60 mm x 60 mm would refer to the depth and width of the upright.
Each j-hook is designed to match those measurements. Due to the bracket, which wraps around the upright, you cannot use a j-hook for a 60mm x 60mm upright on a power rack that has a 70mm x 70mm upright. The bracket won’t fit the upright.
Alternatively if you use a 70mm x 70mm j-hook on the 60mm x 60mm upright, the j-hook will fit but it will be loose.
You would find the measurements in both the J-Hook and the Rack Listings.
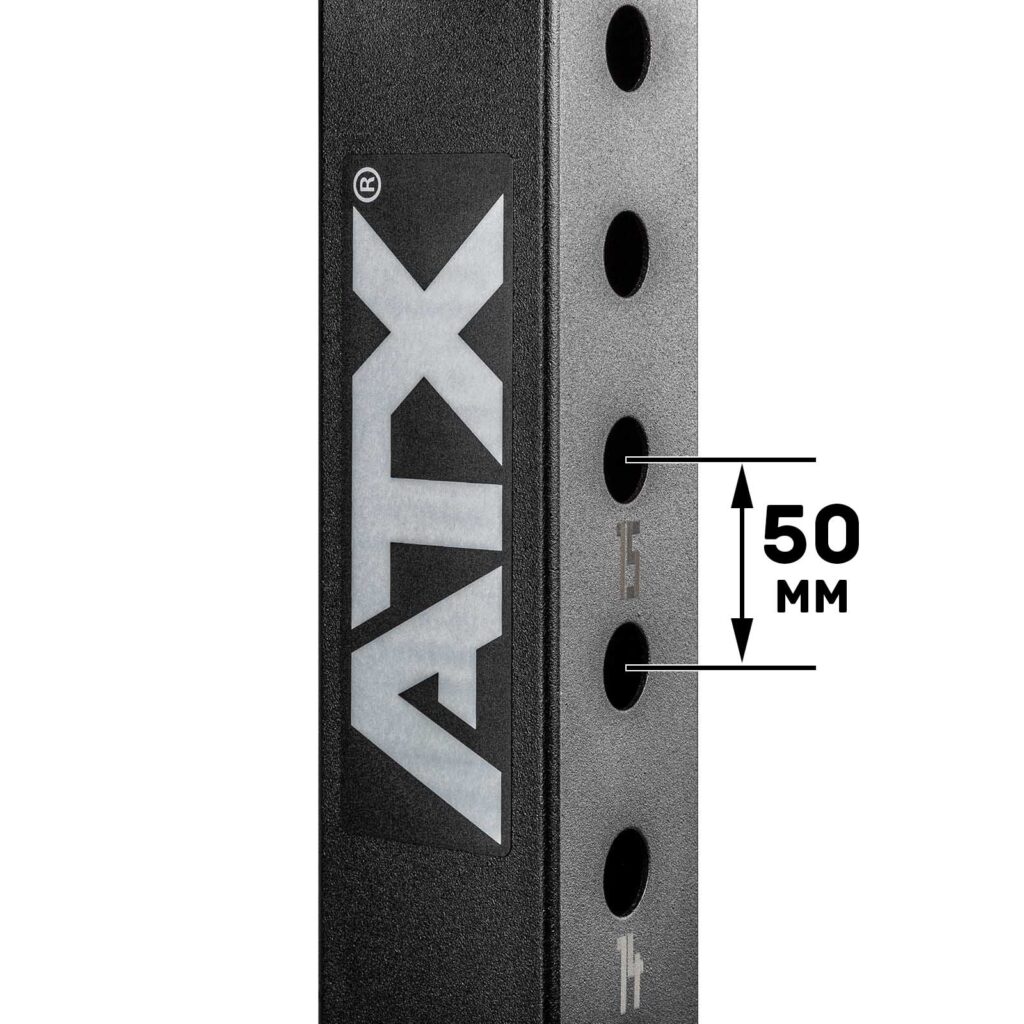
Hole Spacing – Centre Distance between the holes
Hole spacing refers to the distance between the holes on the upright. The closer the hole spacing, the easier it is to get yourself into the ideal lift-off position.
Originally holes were drilled into the uprights. DIY rack builders during the COVID pandemic period found out that this was extremely time-consuming. On older racks, there was normally a generous hole spacing to make the rack more cost-effective.
Or in the case of the DIYers they just drilled the holes required for benching and squatting.
As manufacturing technology improved there were machines where you fed in the upright and it punched the holes for you. With this streamlined process, the hole spacing distance shrunk. The distance between the holes on most of the current ATX® Racks and Cages is 50 mm.
Some attachments like the ATX® Monolift or ATX® Roller J-Cups use two pins for docking which greatly improves stability. If you would want to use these attachments on your non-ATX rack you would have to measure the CENTRE to CENTRE distance between the holes.
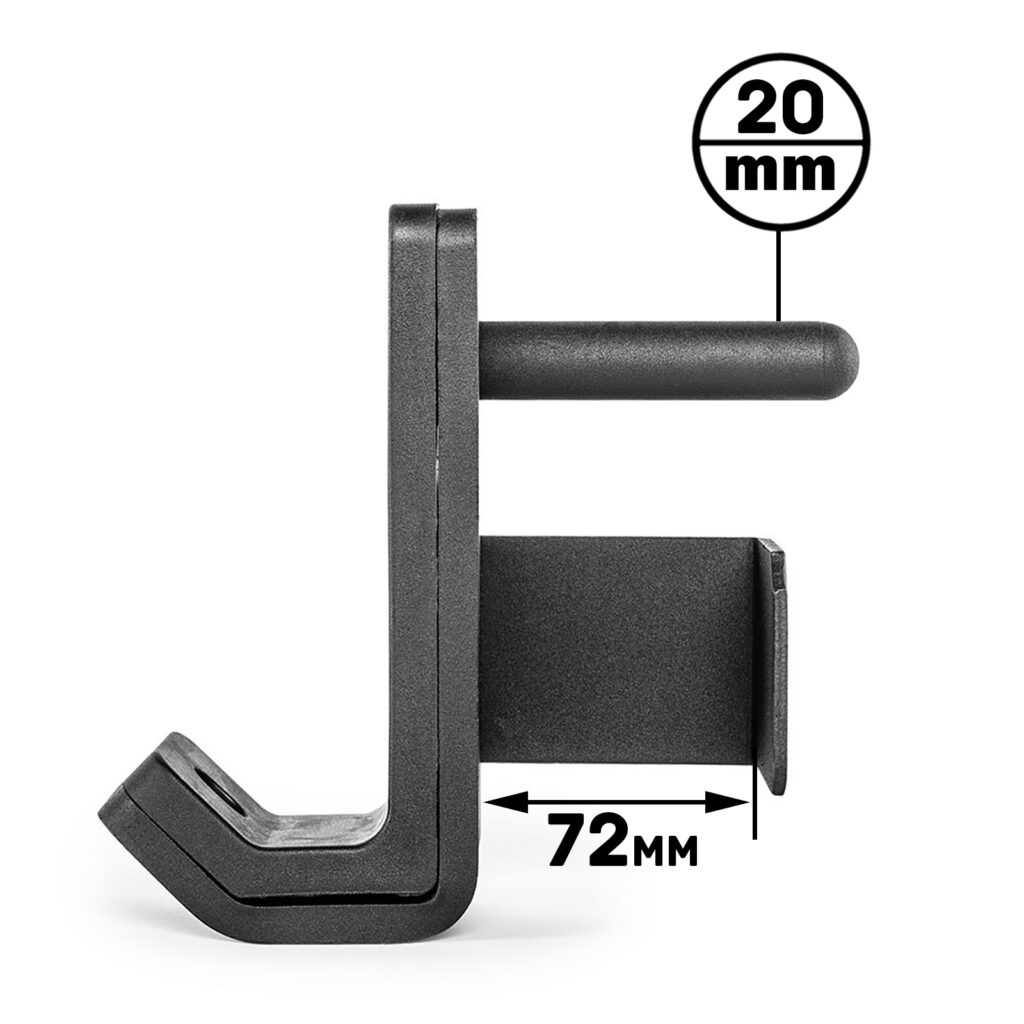
Pin Diameter
Over time, the pin diameter has shrunk as the demand for closer hole spacing has grown. The pin on the j-hook is the part that is inserted into the power rack’s upright holes and holds the j-hook in place.
It is important to know exactly the girth of your pin if you intend on inserting it into unfamiliar holes. If it is too thick it will not fit. If it is too thin there will be too much play.
To find out the pin diameter of your machine you can either measure the internal hole diameter in your upright or the J-Hook pin diameter.
For example, most ATX® Accessories have 20 mm pins while Racks have 21 mm internal hole diameter.
Rubber or Nylon Bar Protector
These nylon or rubber strips would protect your barbell from damage and extend the longevity of the barbell. As well as reduce the noise while training (great if you like to train in the morning!)
Nylon insulators
The insulators would go on the inside of the lip which wraps around the upright. It would protect the paint of the uprights. While it is not essential it does help a lot to protect the paint of the uprights. Plus once again it helps reduce the noise.
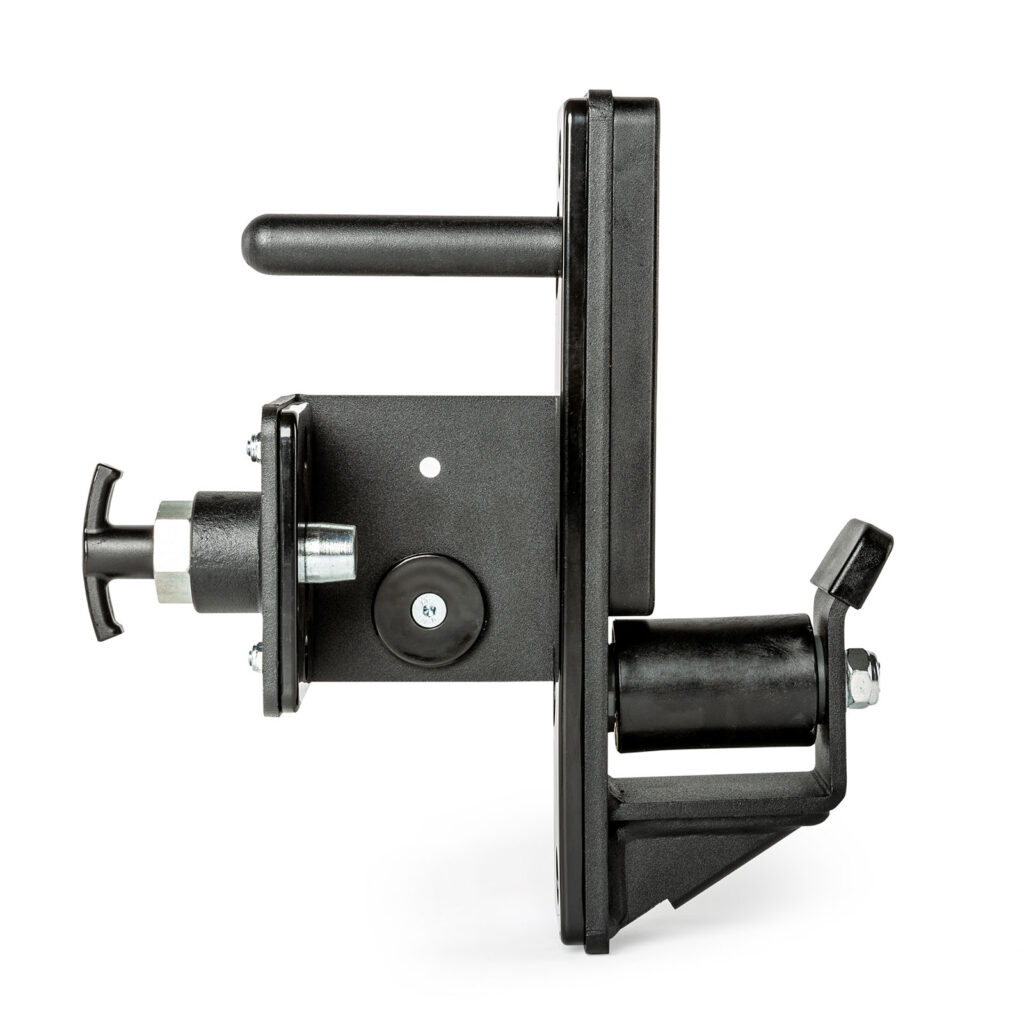
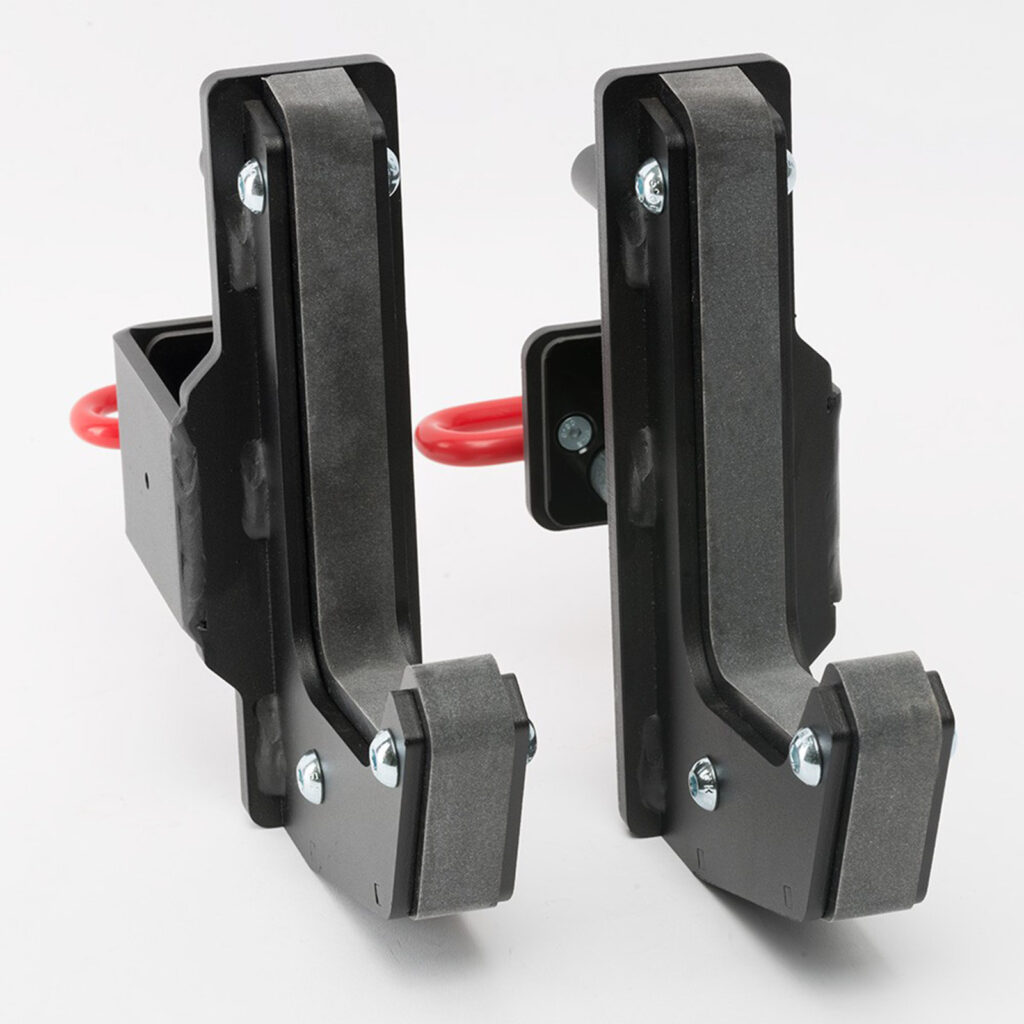
Spotter Arms
Safety Spotter Arms were originally designed for the squat stands and half racks, but they quickly were adopted by bench press enthusiasts and people who find training inside of their power cage a bit too claustrophobic.
Even though there are quite a few of different designs on the market, most of them share these features:
– Gravity lock System – allows you to easily change the position of the safety spotters by just sliding the pin through the upright and allowing the gravity to do the rest.
– Rubber Strips – designed to protect your barbells coating/knurling from damage and reduce the noise in case the barbell is dropped.
– The lip at the end of the shelf, prevents the barbell from rolling off.
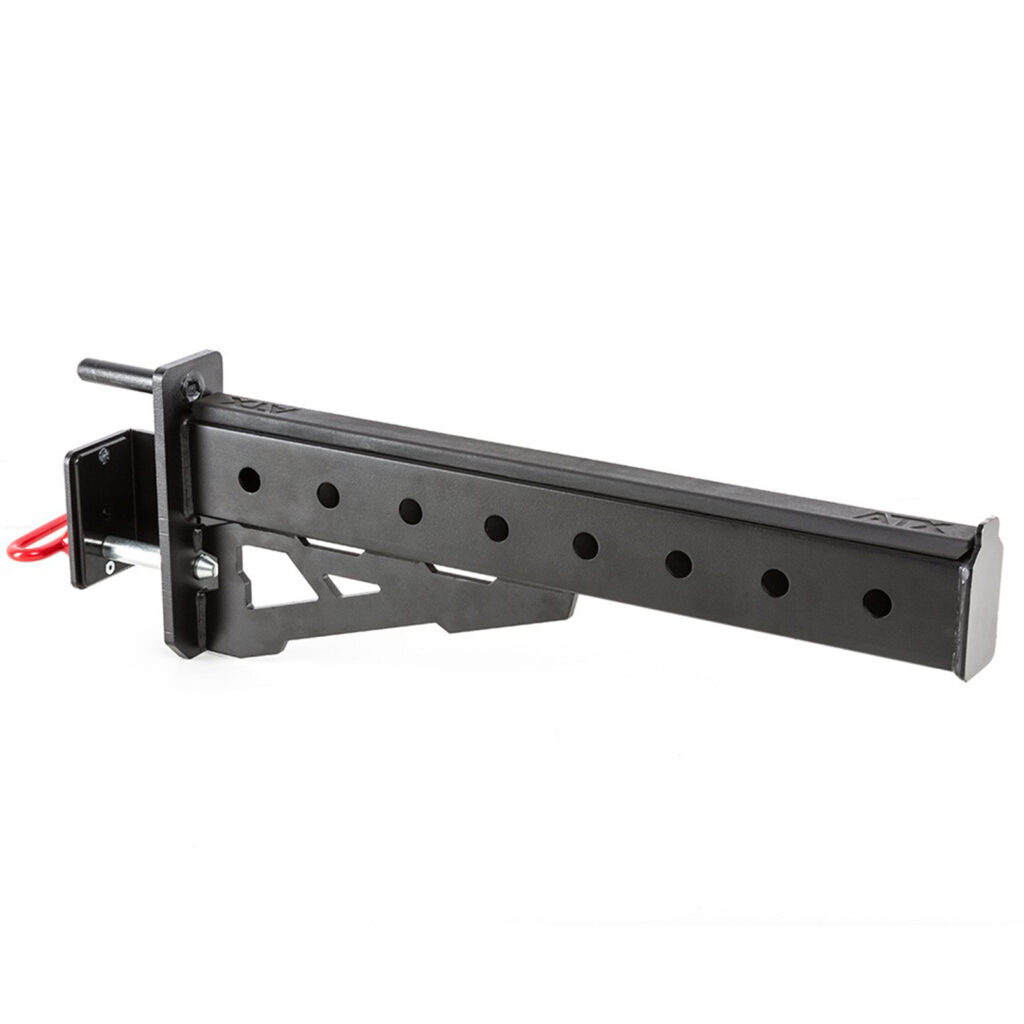
The core difference between the spotter arms and the spotter bars would be the shorter catching area. Since the Spotter Arm is attached to a single upright, it does not boast the same weight load capacity as the spotter bars.
Beware of spotter arms that are too long. Yes, they seem impressive, and if it were that easy to make them long then everyone would be doing it. Some designs have no bracing underneath. Combined with the extra length, a heavyweight at the end will place tremendous strain on the joint.
Some Spotter Arms offer additional features:
– Face Savers – these angled lips at the front of the spotter’s arms can come in really handy when you are bench pressing If you would miss the J-Cup the bar would not fall on your face.
– Some spotters come with holes for band pegs if you want to do some training with resistance bands on your barbell. Ideally, you would opt for a spotter which has two locking pins as otherwise, the resistance band training might make a bit of noise as the spotter arm may move around a bit under the load of the band. The snugger the fit, and the smaller the play, the less likely that this will be an issue. Or you can just turn up the stereo!
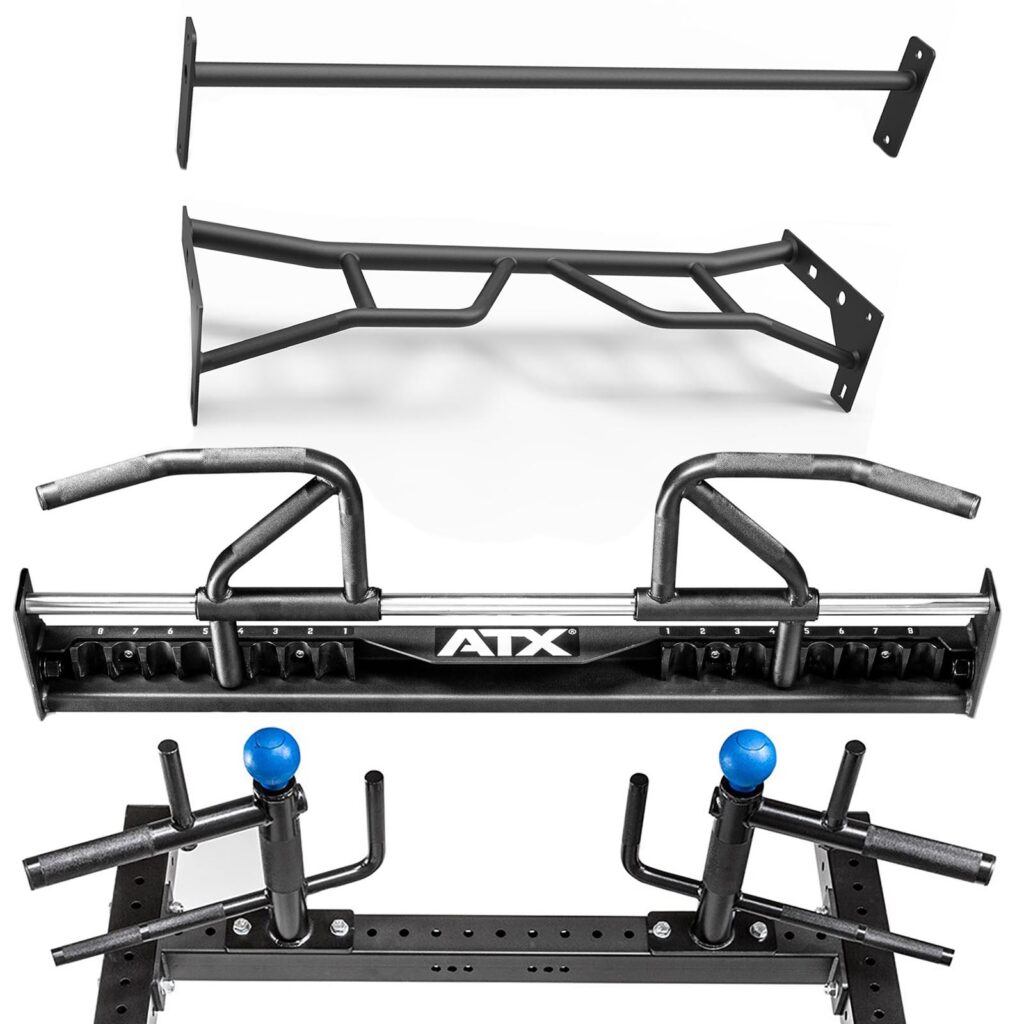
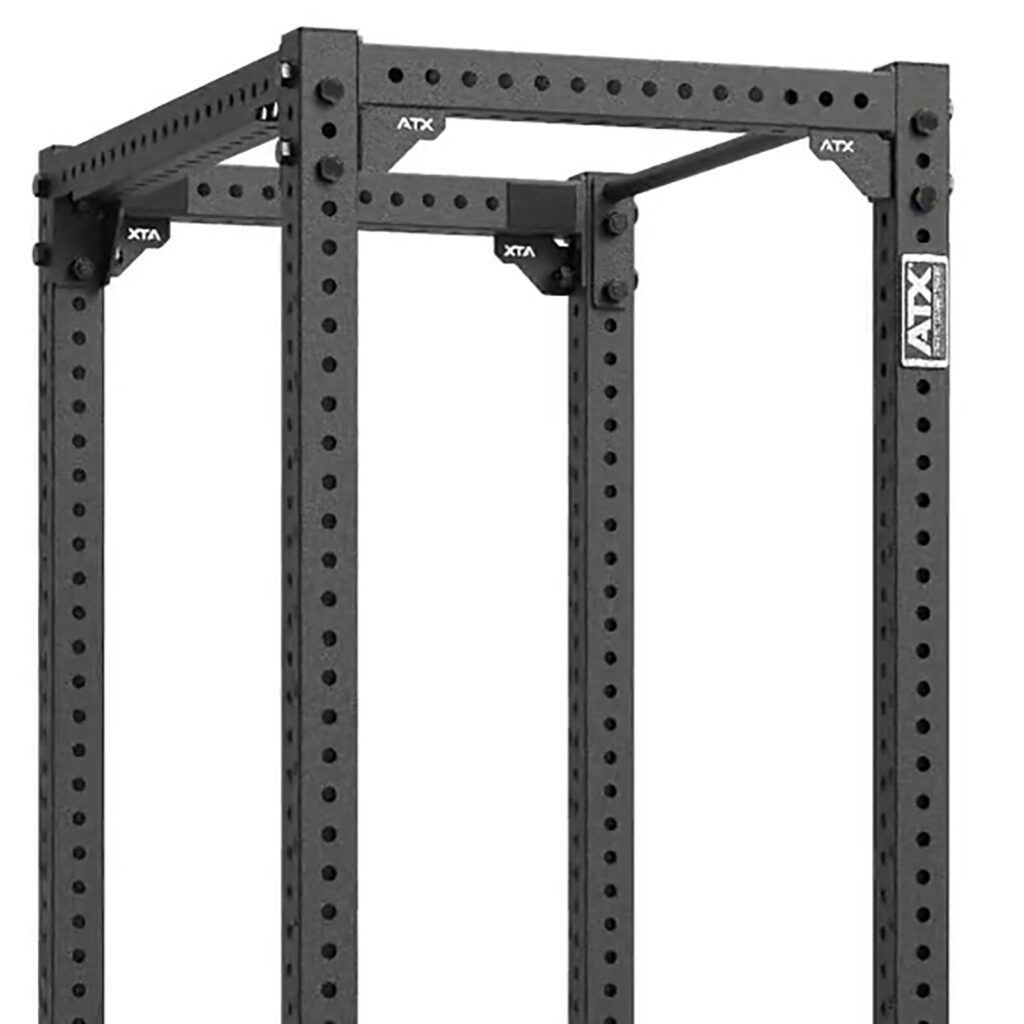
Chin Ups
Not only does a chin-up bar offer one of the greatest upper body exercises, but it also plays a role in improving the structural stability of the power rack.
There are a few different types of chin-up bars which can be attached to your cage:
– Straight Bar – the most common type of pull up bar available for power cages, the diameter of the bar may vary depending on the rack you have. If you are an old school trainer or crossfitter, then this will be your favoured choice. Generally, this will be the cheapest option too.
– Multi-Grip Bar – these are generally the most popular style for power racks these days. They provide a great balance between training functionality and affordability. The multiple gripping areas allow you to perform several chin-up variations.
– Indexing Chin Up Bar: Only available for the PRX-750&770XL Racks, are the latest evolution in chin-up bars. The indexing system gives you even a wider (and narrower!) variety of grip options. Shoulders are one of the most compromised joints in weight trainers, so being able to find the perfect groove is a godsend for some.
– Pull Up Station: only available for ATX® PRX-800 Racks. This is the ultimate in chin up variety. Not only will you work your back, but you can also have a killer grip workout.
The bomb grips are tough just hanging on to them, let alone doing pull-ups. If that is not enough there are thick grip handles too.
Spotter Bars
Safety Spotter Bars sit inside of your cage, between the uprights. They provide the best possible protection from getting crushed by a barbell (assuming you will set them at the correct height). By docking into each upright they have much more support than a spotter’s arm.
The other advantage of spotter bars over spotter’s arms is that they fully contain the barbell within the confines of the power rack. This is valuable in case you pass out while performing a heavy squat.
Inexperienced trainers often try their hand at advanced breathing techniques while chasing personal records. They sometimes forget to breathe! If you do blackout the bar is stopped at the front, back or bottom. Whereas with spotter’s arms if you blackout and go backwards there is nothing stopping you.
While this is rare, it is just another reason why it is sometimes worth shelling out the extra dollars to go from a squat rack to a power cage.
Types of safety spotters:
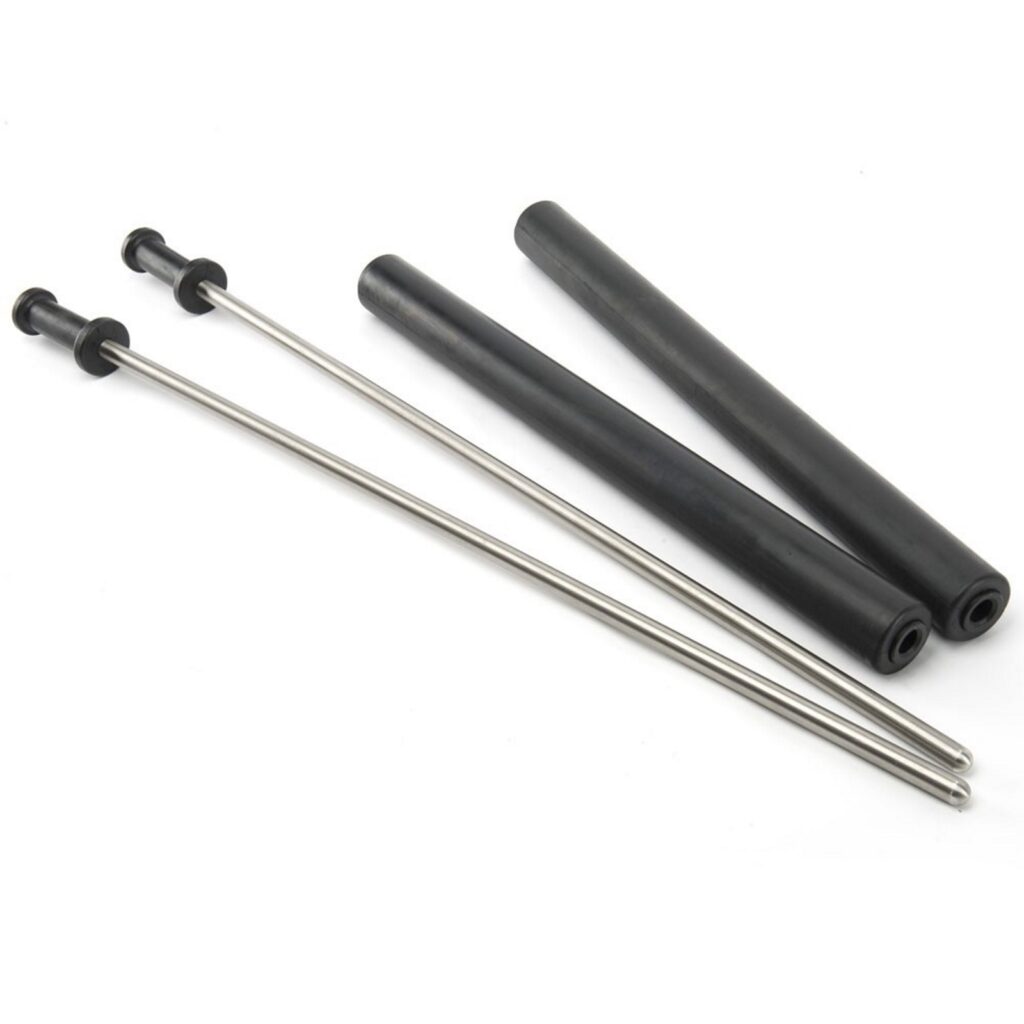
Pin Pipe System
The most popular option for power cages, purely because they are extremely simple to manufacture and they provide an exceptionally high weight load capacity. Plus, they are straight forward to use.
Features of the pin pipe spotting system:
– Usually are manufactured out of solid steel bar.
– Comes with steel or steel/rubber casing for improved barbell protection.
– Great weight load capacity
– Great for pin presses as you can slide the barbell into the correct position due to the casing.
– Some of the pin pipe handles can also be used as secondary J-Hooks.
Downsides:
– Bare steel pin pipes can be loud and damaging to your barbells coating and knurling.
– Takes a bit longer to adjust compared to other systems.
Regarding barbell protection, it is much more important on j hooks compared to spotters. There will be more contact between the barbell and j-hook, compared to the barbell and the spotter. Plus, the contact between the barbell and j-hook will be more dynamic – moving the barbell into the correct position, racking the barbell while fatigued.
Generally, when you fail a lift, the put down is controlled. The likelihood of damaging your bar on the spotters from this minimal.
For a monumental fail when the bar drops from a significant height, a thin strip of rubber is not really going to offer much barbell protection. That is why I do not use the casing when using pin pipe spotters. It makes it a hell of a lot easier to adjust the height, without really risking barbell damage.
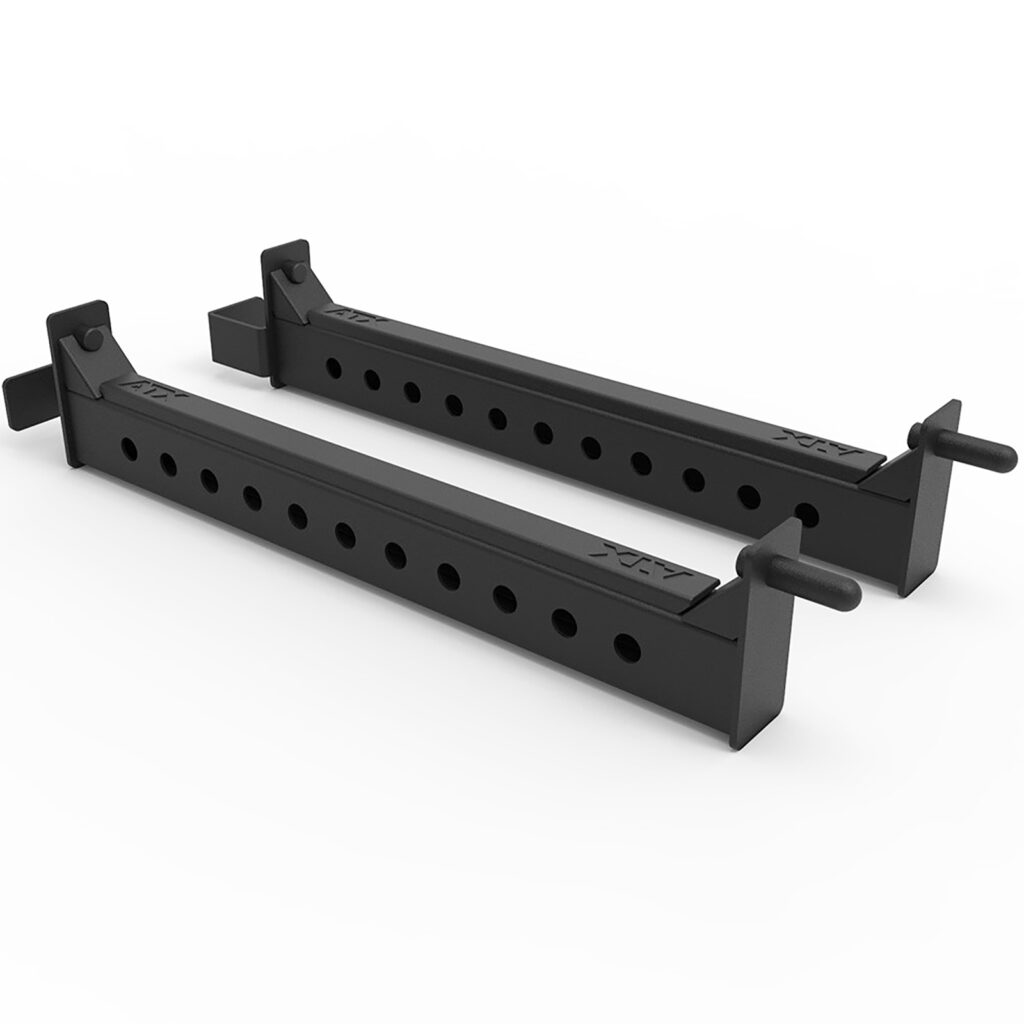
Flip Down System
Flip down spotters offer an easier method of height adjustment, especially if you are using a steel or rubber casing on your pin pipe spotters. In a cramped gym, pulling the pin pipe spotters out does take a bit of space, which may be another reason to opt for this system.
Features of the Flip Down Spotting System:
– Gravity lock system makes it easy to change the height.
– Rubber strips to protect your barbell.
– Wider Bar catching area will offer better protection for your barbell.
– Some of the Spotter Bars features Face-Savers
– High-Weight Load Capacity
Safety Strap System
Usually manufactured out of thick 3-ply nylon strap which gives the safety strap system one of the highest weight load ratings.
The ATX® Safety Strap Systems offer quite a few attractive features:
– The height can be adjusted with a single arm.
– You can set the straps at a different height so that the safeties would also work as face savers and force the barbell to roll away from you.
– The widest bar catching area alongside flexible straps will offer the best barbell protection.
– Exceptionally high weight load capacity, the straps themselves are rated for 2000 kgs.
The safety strap system does offer the best possible protection for you and your equipment. They are also the easiest to adjust. The only downside is the price!
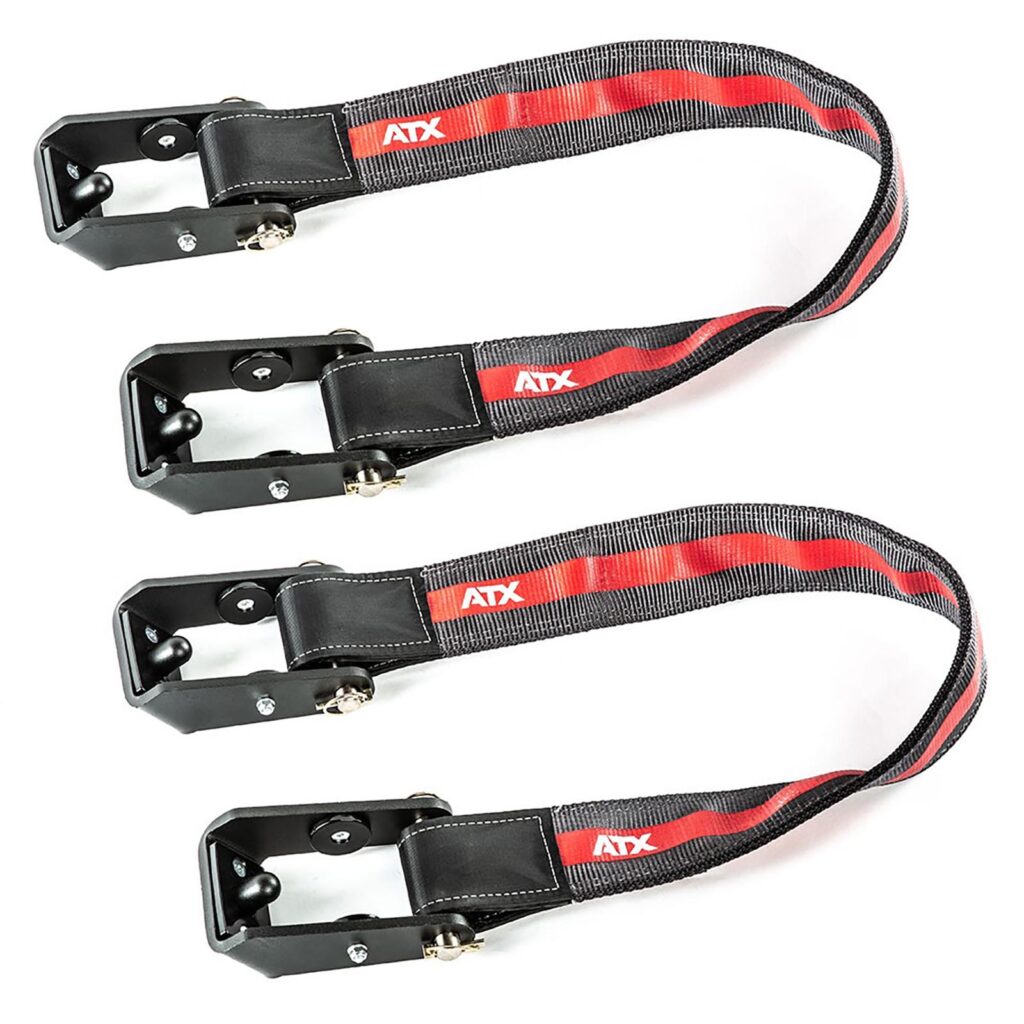
Even though some people would by them just for the bragging rights, I do not think they are worth purchasing if you are not an elite level powerlifter.
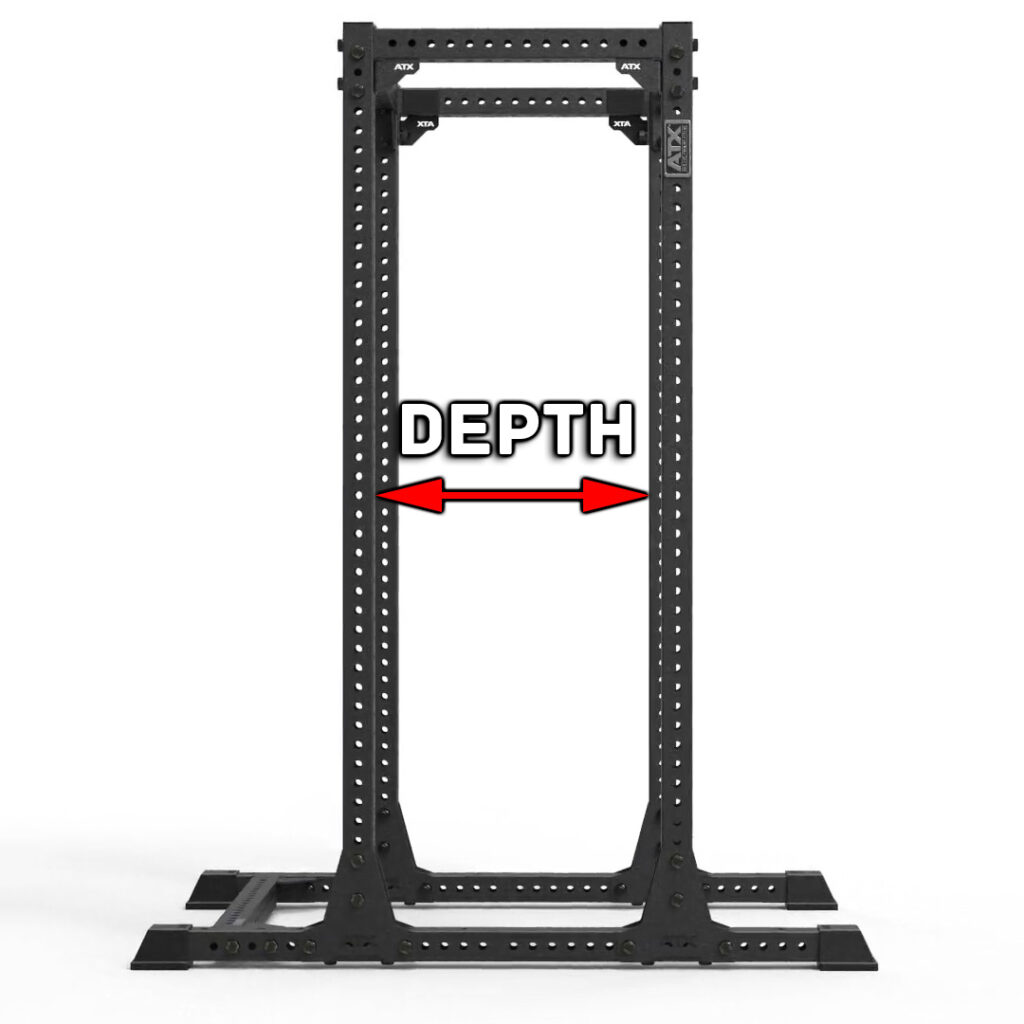
Internal depth
The internal depth is the internal distance between the uprights of the power cage.
The main reason it is included in every single Power Rack listing is to show you how much space you would have inside of it. The distance can range from 45 cm all the way up to 110 cm!
Domestic and light commercial power racks are relatively compact. Many people mistakenly think that they will not have enough room to perform squats. Nothing could be further than the truth.
Whether you are doing a squat or a bench press, the barbell path is pretty much straight up and down. Yes, there will be a bit of an angle or arc, but the shortest path is always close to vertical. The racks with just 45cm internal depth are big enough for nearly everyone, so the 65cm will work for everyone.
Knowing the internal depth of your power cage will also come in handy when you will be purchasing spotter bars or jammer arms.
Barbell Distance requirements
While people unnecessarily worry about the depth of their power rack, they completely forget about the rack width. When the market was initially flooded with cheap crap from China, some of the young players got caught out.
To keep the costs down, they made racks narrower from a width perspective. What is the problem? You can fit shorter barbells on them after all. The big issue is that if you have a wide hand position when squatting it made re-racking the barbell tricky.
There was the possibility of cutting your thumb nail off at the first knuckle!
The distance between Uprights or the width of the Squat Rack/Power Cage can range from 119 cm to 123 cm.
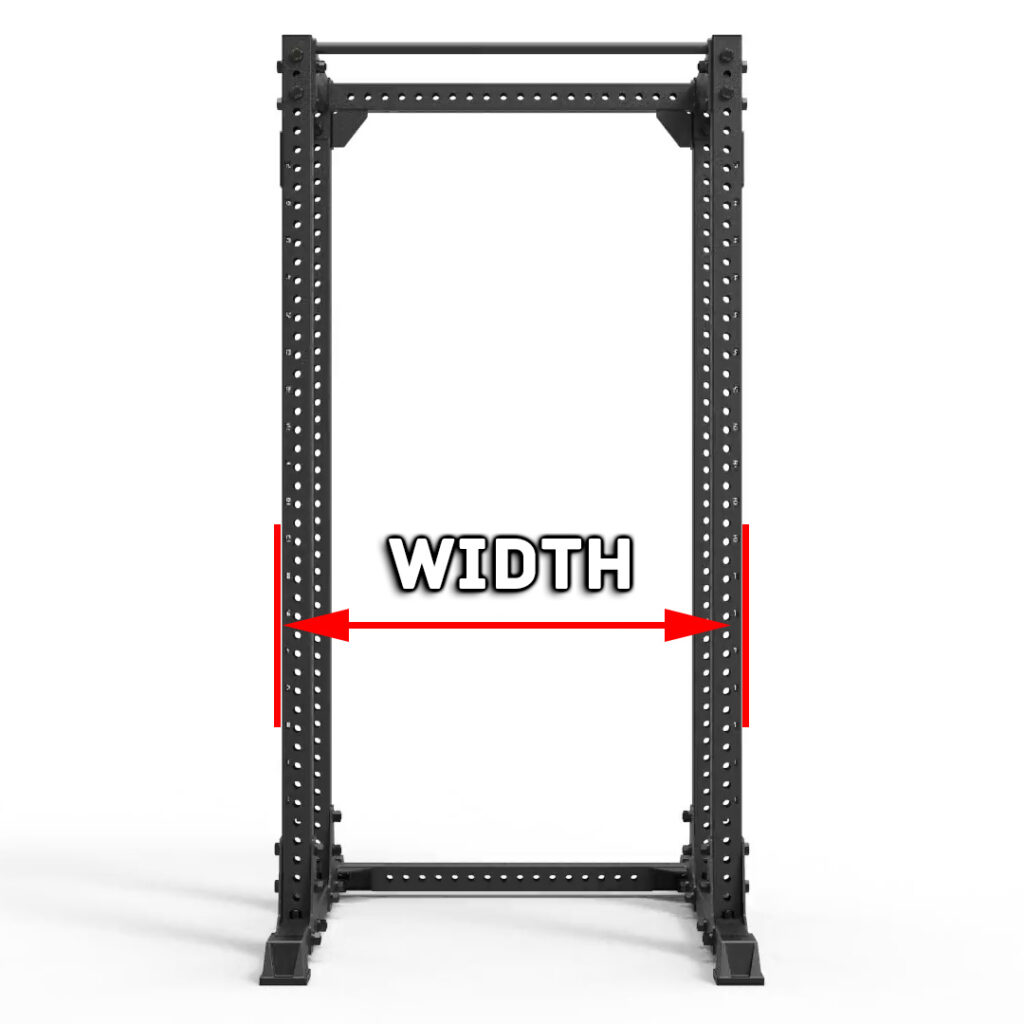
You need the distance between the barbells sleeves to be longer by at least 5 cm to be able to use it comfortably. There is nothing worse than having to line up the barbell when you are squeezing out that last rep under duress.
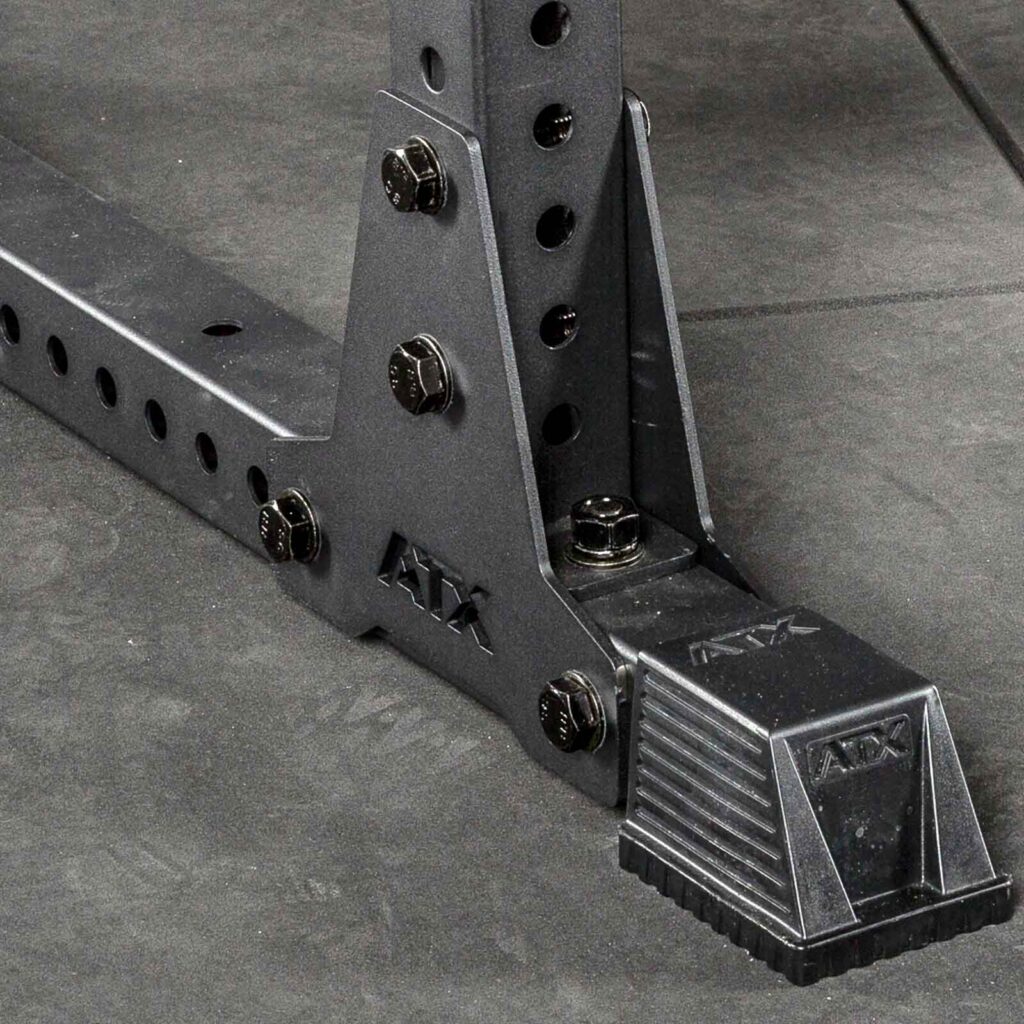
Upright Width and Steel Thickness
While it is important that adequate steel is used in the construction of a power rack, it is not the be-all and end-all. You can use the biggest and thickest steel, but if the design is substandard there is still the potential for failure.
There has been many a “fully commercial” power rack that boasts steel akin to armour plating. Yes, it is unbreakable. But when tightening it up you rip the head clean off the cheapest bolt you realise where the weak links are – everywhere!
This is where clever design comes into play. If you can build a rack that delivers maximum strength and durability from the selected material, the customer gets a power rack that packs plenty of punch at an affordable price.
The ATX-PRX-620 rack features 60mm x 60mm uprights with a 2mm wall thickness. This is classified and certified as a domestic rack. But yet as you clearly see from the video, it offers superior stability to that of a rack with 75mm x 75mm uprights and 3mm wall thickness.
Reinforcement Plates, Brackets & Bolts
These are probably the most important parts of the power cage; anyone can make thick walled uprights but putting them together is where it becomes interesting. This is an area where there have been some real improvements which have been made possible with new machinery becoming more readily available.
Brackets can now be made that require less material but also offer greater strength. This in turn reduces the need for thicker walled uprights.
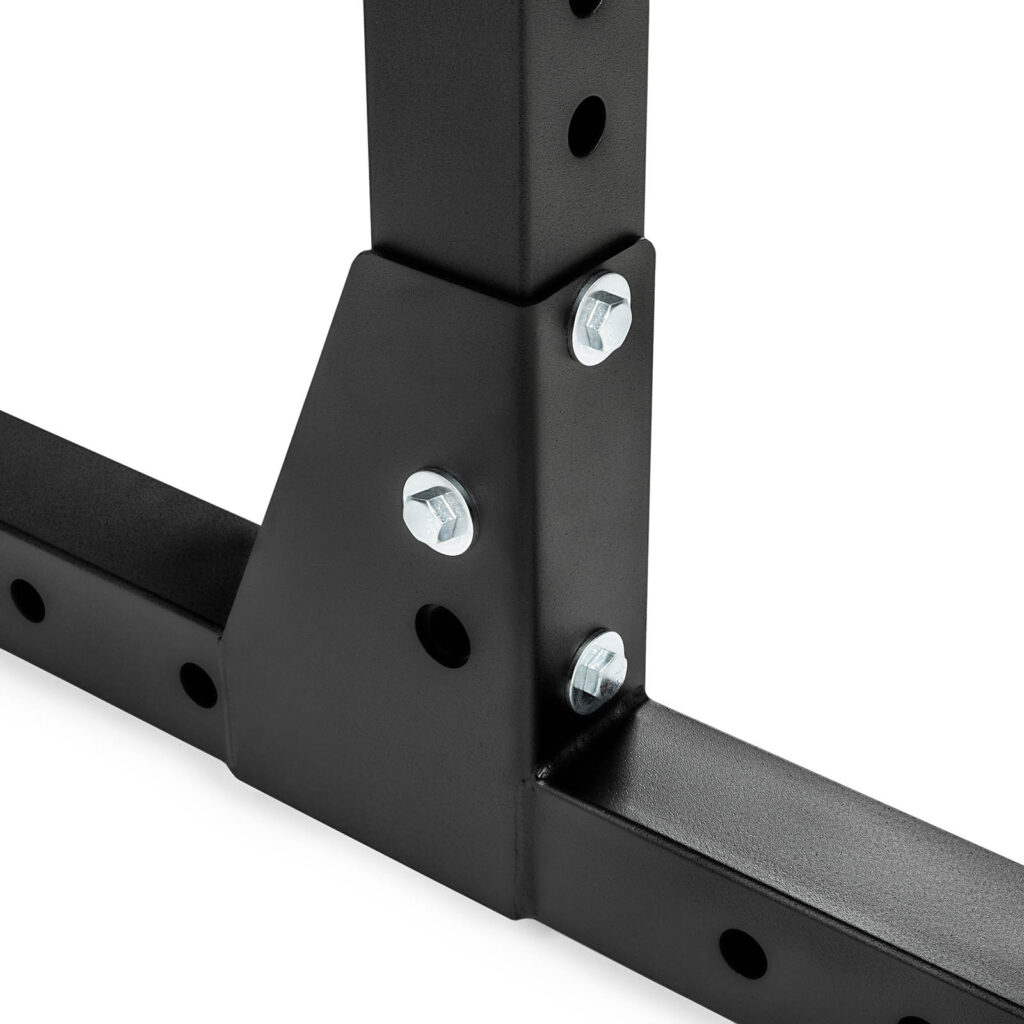
Reinforcement Plates
Reinforcement plates were used to stiffen up the rack where the base and uprights met. Old racks used very basic designs – just a piece of plate bolted into place over the joint. Do not get me wrong this did the trick, but there have been some improvements.
They were also used to stop the steel tube from bending when you tightened up the power rack. Generally the tighter the nuts and bolts, the stiffer the rack.
Reinforcement Brackets
Reinforcement brackets is another feature which Germans adapted to both their Domestic and Commercial racks.
The brackets offer increased bracing over reinforcement plates. They aim to eliminate movements in joints by bridging the various parts together.
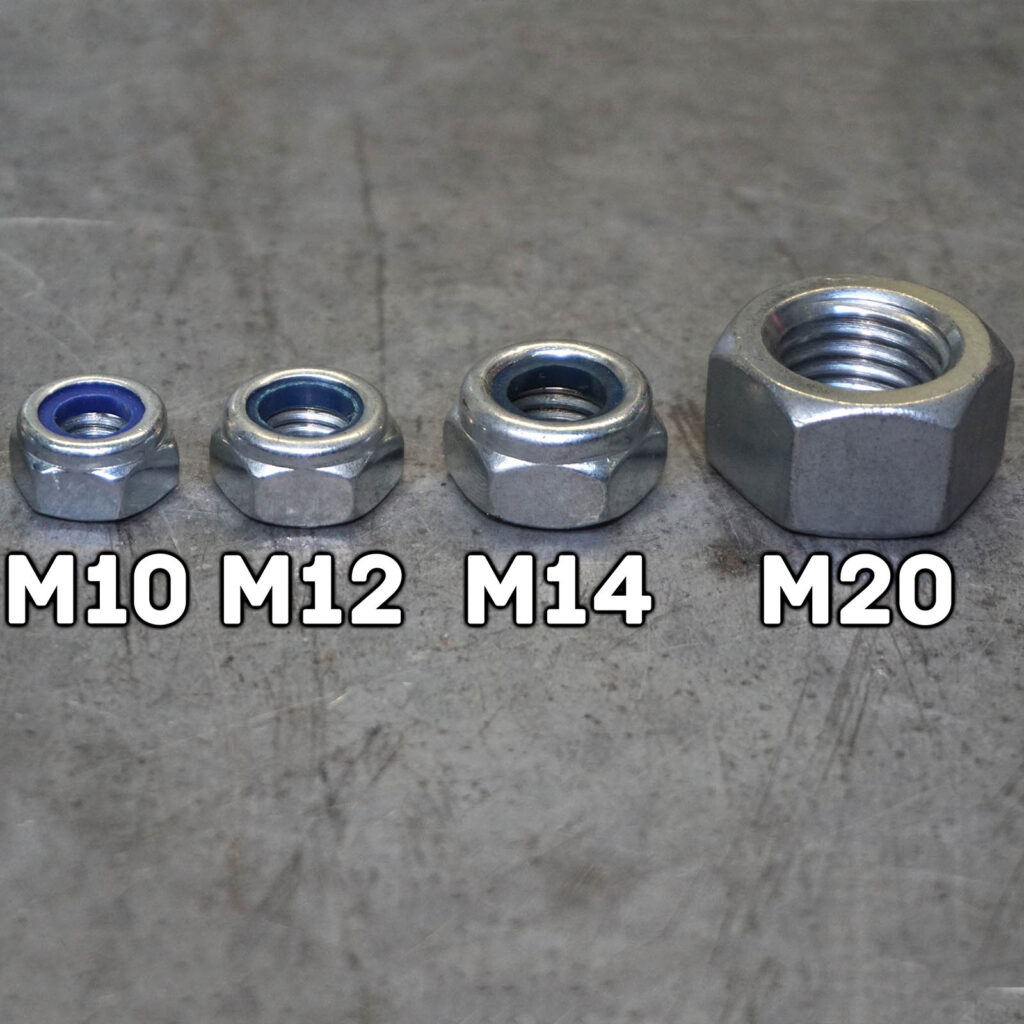
The Biggest Nuts
While most manufacturers would be able to get away with using small and low tensile strength hardware. ATX® decided to bulletproof their racks with high tensile hardware. which are used in industrial applications.
Three main sets of hardware used in ATX® Racks and Cages:
– M12
– M12/M20
– M20
The M stands for metric and the number indicates a bolt size in millimetres.
The smallest bolt you will find in the ATX Racks is going to be 12 mm in diameter while the thickest one will be 20 mm. Needless to say this is a massive overkill even for the world’s strongest.
Certified
ATX® Equipment is certified either for domestic or commercial use in the European Market. This gives the rack an accurate rating and helps the customer to choose a rack to suit their needs.
This also means that the weight load capacities stated on the listings are supported with testing according to a universal standard. These tests are not just static – the weight just sits there – but rather by a range of motion.
They are also cycled tested for durability – a certain number of repetitions depending on whether they are domestic or commercial.
EN 20957 I.II.IV – H – Domestic Use
EN 20957 I.II.IV – S – Commercial Use
What about commercial Grade?
Since there are no unified standards here in Australia, you make your own test up and choose the highest outcome. This allows retailers to splash the phrase Commercial Grade without having to back it up. So commercial grade statement is nothing else than the retailer’s subjective opinion.

Warranty
ATX® 3/5 Year Manufacturer’s Warranty – by purchasing an ATX® product you will receive either 3-year or a 5-year warranty. Which covers manufacturing and material defects. Warranty does not cover friction damage which occurred during use – to paint, upholstery, and cables.
Why not a lifetime warranty?
Offering a lifetime warranty versus supporting a lifetime warranty are two vastly different things. We know because people ask us for parts on competitor’s products that are covered by lifetime warranties.
The beauty of selling quality, well-designed gym equipment is that if there are no initial manufacturer’s defects there is bugger all chance of issues down the track. Basically, if they build sweet initially, they will still be standing years later.